Let’s begin our studies by dispelling some common myths. There is no doubt that talent plays a great part in the creation of great art, but for the basics -- that is, the rudiments such as drawing and painting, the reality is that most of us can do it if we know how. It doesn't take any special skill or any special talent to be able to draw and paint a realistic image. Seriously....I'm not kidding! The basics of accurate drawing and accurate observation of values and colors and color mixing are crafts, and a craft can be learned by anyone.
 This Gary Larson cartoon shows God creating the snakes, but the myths surrounding the creation of heaven and earth has it that God for his very first act created light. And that's what we'll do -- okay we won't create light, but we will learn how to use it as an artist uses light. Light and shadow form the very basis of painting and drawing. Most people become victims of light, that is they accept whatever is given them. If the lights are on in the room…well, that's the light... no questions asked. So they get stuck with the light, usually they're also stuck with the models, along with being stuck with the position in which their easel is placed. No wonder they feel stuck.
The purpose of this introduction to lighting is to get us unstuck... and get us unstuck at the very beginning, at the point of light.
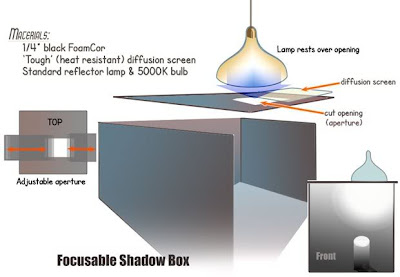
The best way to understand light is to have a controllable environment, and the most easily controlled environment for the artist is through using a shadowbox. A shadowbox is a relatively easy thing to build in your studio, especially with today's materials. For ours we will be using quarter inch FoamCor, which is readily available at most art stores. We want to use the black FoamCor, which is black on all sides and in the core. FoamCor is very sturdy stuff, easy to cut and work with. The box can be put together with tape.

We'll be making an open front box that will have the bottom, two sides, a back and a removable top. The top will have an opening over which we can place some diffusion screen and other pieces of FoamCor to vary the size of the opening. There's no special size to the box. You can make it any size that fits conveniently in your studio and accommodates the subjects you'll be using your still life. You can make a number of different sizes to accommodate different subjects.
For the materials you'll need to quarter-inch FoamCor, some tough diffusion screen -- it's called tough in the trade because it resists burning discoloring and wrinkling due to the heat from the light. The most popular company making gels and diffusion screens is Rosco. Gels and screens are handled by companies specializing in theatrical lighting. You can also get them online.
For the light source, get a simple stainless reflector. These are available at places like HomeDepot. Get a daylight bulb, about 5000 K. The bulb needn't be terribly bright, 50 W should be fine. After all we are lighting a very small area so we don't need a tremendous amount candlepower. Any bigger bulb will create too much heat, so I'd recommend something smaller along the lines of a 50 W -- start with that (those little screw-in fluorescent bulbs would be a good choice...as long as they are daylight bulbs). The reflector will be resting directly on the FoamCor at the top, that is on the roof or ceiling. You will cut an opening over which the reflector can be placed. As you can see in the diagram, the diffusion screen (if you choose to use one) is laid directly over the opening. You will also cut strips of the black FoamCor or matte board for use in narrowing the aperture, that is narrowing the opening.
This is where we will really learn about the nature of light, because it's not just about light, it's also about shadow. By manipulating the balance of light and shadow, and its quality, along with the type of edges that are produced, we will be mastering one of the most important skills the artist can have. The emotion that we produce in a picture is largely a result of the balance of light, shadow and edge. The nice thing about the light box is that it allows us to experiment. It's when you experiment with light that you begin to understand the emotional content you can create by manipulating the light and the shadow.
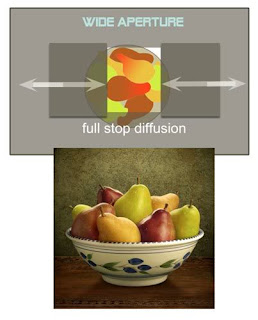
 In this first example, we want to make the pears look round and have weight. Here we use a wide aperture. The reason for that is to have some of the light spill into the shadow. This creates a more open shadow, and that lack of contrast makes it less dramatic -- we're not looking for drama in this picture. We've also added a diffusion screen... and this is described in terms of how much light it absorbs in making the diffuse light. In this case, it's a full camera f-stop. We've positioned the aperture directly above the bowl of pears and that's what creates, what I like to think of as, a friendly light... nothing too dramatic, but all of the information is right there for the viewer to take in.
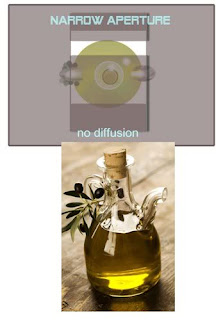
 In this next example, the bottle of olive oil is much more dramatically lit than was the bowl of pears. Also, here's something so few people do with a shadowbox, again it goes back to being stuck. They all get stuck on a black box. They don't change it, when all they have to do is to add a little bit of drapery in the background, or something on the floor. In this case, we added a bit of wood paneling. Very simple. Because the paneling is light, it's reflecting light back into the subject, this is very important in the case of glass, as it is the light that defines the content.
By making the aperture very narrow, and aimed somewhat behind the pitcher of oil, we've produced a lighting situation with much higher contrast than the bowl of pears. Also note, that we're not using a diffusion screen. What we've made is a thin sliver of raw light, and that's what produces the sharper edges, the sharper highlights and the sharper shadows.
This is the very first lesson on gaining mastery over art. As the cartoon shows, it's easy once you know how. And knowing how begins with an understanding of light and shadow. By making your own light and shadow you are no longer a victim of whatever light happens to be offered.


3 comments:
You are right. light is the core of all work. We must understand it before anything can be accomplished. This is such a detailed explanation! Thank you for the effort and time took to put it together.
Thank you, Theresa. It means a great deal to us to have these lessons picked up by people who will use them well.
Post a Comment