An ellipse is no more than the visual description of a circle viewed from different angles. Hold a dinner plate straight up and it's circular. But lay it down, it becomes elliptical until, viewed from the edge, it becomes a straight line. This is why the lip of a tall water glass is a very different ellipse than the base viewed from exactly the same angle. Even more to the point is liquid level is also different...partway between the ellipses of the base and of the lip.
By defining your ellipses perfectly, you can make a drawing of a wine glass and define exactly where in the visual plane it is ... whether the viewer is above of below. The effect is so powerful that it defines the space surrounding it, making it (in your mind's eye) go back in space in a specific dimension, even though that is implied.
Obviously, mastering ellipses is a powerful tool for the artist. Once you understand how ellipses are formed, you will be able to bring that knowledge to freehand drawing. What follows are two methods for making accurate ellipses and their value for you will be in that you will understand the underlying mechanics, not that you’ll often use these methods in you day-to-day drawing. Still, for those times when there’s a little something wrong with an ellipse, the second method is what you can use to check and correct.
STRING METHOD: this is the best known method for making ellipses. It’s moderately accurate but of greatest benefit when you need to draw large ellipses. Here’s a chance to do Crop Ovals, amaze your neighbors and get written up in The Enquirer!
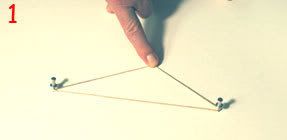
Tie a piece of string so when the loop is pulled tight it is approximately to the width of the ellipse. Put a pin in the surface of whatever it is that you are drawing on. Then put the second pin inside the loop and move it so that, stretched from the center, it forms a triangle with the top approximately one-half of the height. Obviously this is all approximate because as you make the height taller, you draw in the sides.
Select any spot on the string. Don’t worry because you’ll be coming back to exactly that spot. Keeping a steady pressure on the string, using it as a guide and holding your pencil absolutely vertical, simply follow the string where it leads you and where it allows you to go.
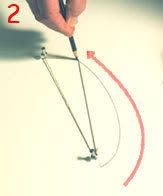
As you can see, the hand is holding the pencil vertically throughout. Simply follow where the string leads you. In this case we used a waxed string. We had started with a thicker string but it kept tangling the pencil. It’s also important that the string you use will not stretch. That will distort the ellipse.

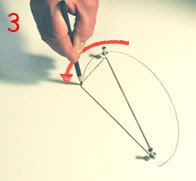
Here’s the final ellipse. It’s pretty accurate and took all of a couple of minutes. This is definitely the method to use when you need to make large ellipses to fit a specific area.
THE DOT METHOD: this is a bit more complex but far more accurate. It had been mentioned that this is one of those bits of arcane knowledge known to only to illustrators and cartoonists. It’s almost completely unknown in fine arts departments. Now we will reveal it to painters!
Imagine, in the string method, that we drew a line the longest horizontal axis (where the pins were). Now imagine that at the top of that triangle we had formed, we dropped a vertical line, intersecting at 90°. It’s those crossed lines that will form the basis of what we are about to do.
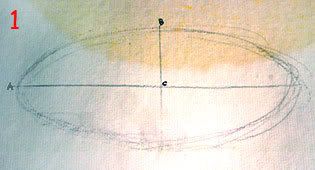
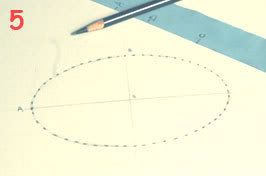
The first thing we did was to rough out the ellipse we want to end up with. Then we rough in the horizontal and vertical lines. In this case, we later sharpened the lines and made an accurate 90° intersection with a straight-edge. Then we label the center with a C (pretty clever, eh?). We then label the horizontal line with an A and the vertical with a B (sorry, no more cleverness).
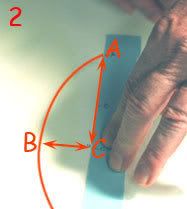
On a strip of paper, we mark the distance from C to A and from C to B. They will always appear in this order C-B-A.
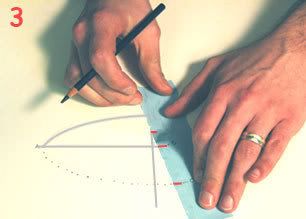
Now we line up B on the horizontal and A on the vertical. Wherever C hits, make a dot.
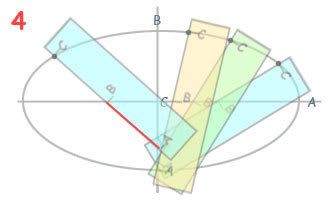
In this diagram you can see how the strip is slid along, always aligning A and B with the horizontal and vertical, and always making a dot where C lands. A few minutes of practice is all it takes.
As you can see, this is a very accurate method of describing ellipses. All that’s left is to connect the dots. No matter if they are horizontal, vertical or diagonal, if an ellipse gives you trouble, you can always use this method to insure that it will be accurate.


6 comments:
incredible tip! Putting this in my files!
Thanks very much vor this tip.
I was going to make a blog post like this but you beat me to it...well done and beautifully described!
SUper :-)
Post a Comment